How to Install a Shallow-Water Anchor
 Though developed for fishing, shallow-water anchors are also great for anchoring at sandbars and shorelines.
Jim Hatch
Though developed for fishing, shallow-water anchors are also great for anchoring at sandbars and shorelines.
Jim Hatch
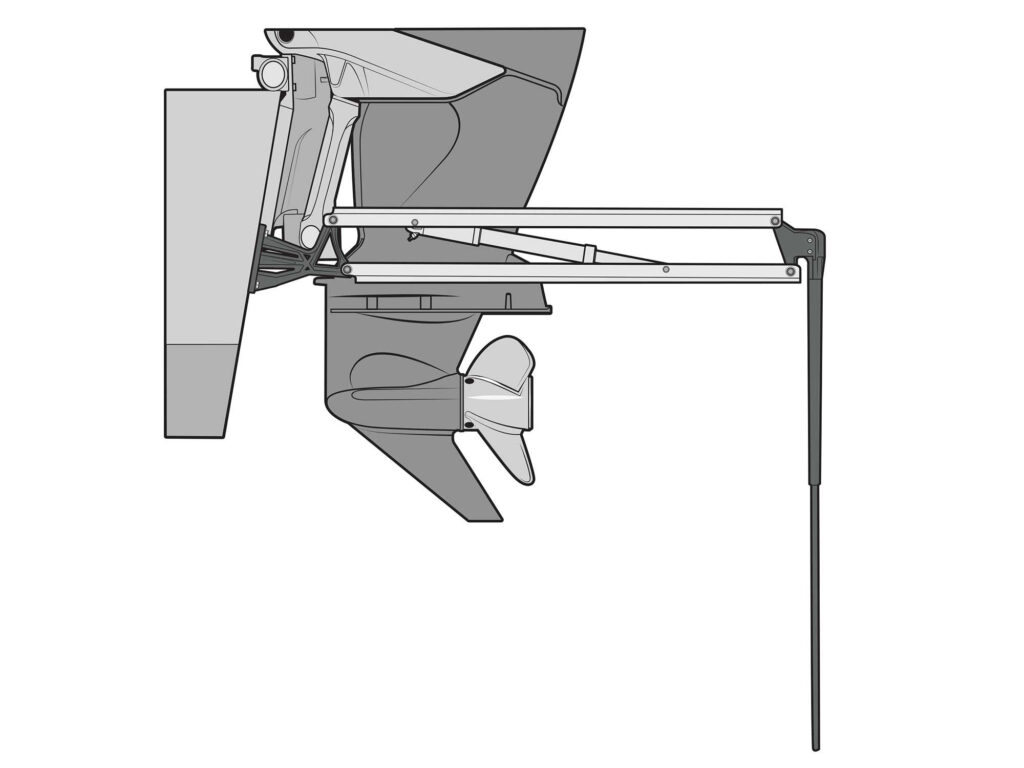
Shallow-water anchors are fairly recent developments that first found application on bay boats, flats skiffs and, soon thereafter, bass boats. Available from brands such as Lewmar, Minn Kota and Power-Pole, these generally attach to the transom or an adapter bracket that integrates with an outboard-engine mount or jack plate.
The device’s articulating arm deploys electrically or hydraulically astern and downward to push a fiberglass pole/spike into the lake or sea bed to hold the boat in place. Though developed for fishing, they are also great for anchoring at sandbars and shorelines. When it’s time to move, the articulating-arm device retracts clear of the water and stows in a vertical position.
Installing a shallow-water anchor represents a fairly easy do-it-yourself project for most boating gearheads, and the electrically actuated anchors are the easiest of all because they do not require mounting hydraulic pumps and lines. For this project, we chose one of the relatively new shallow-water anchors on the market: the Lewmar Axis, which operates electrically on 12-volt DC power and is suitable for boats up to 26 feet in length and water depths of up to 7 feet. It operates wirelessly with a remote-control fob or on the radio-frequency module’s hard-wired switch.
Here’s how we installed this device directly on the transom of a 22-foot bay boat.
Skill Level: 3 of 5
Finish Time: Approx. 3-4 hours
Tools and Supplies- Lewmar Axis shallow-water anchor ($1,198; Amazon.com)
- Marine-grade sealant ($6.99 – $7.99; Bass Pro Shop)
- Watertight cable clam for power and control cables pass-through ($32.61; fisheriessupply.com)
- Power drill ($99; Amazon) and drill-bit set ($7.99; Amazon)
- Socket- and box-wrench sets ($88; Amazon)
- Phillips screwdriver ($9.99; Amazon)
- Masking tape ($3.58; Amazon)
- Marker ($5; Amazon)
- Crimp-on butt connectors with heat-shrink collars ($15; Amazon)
- Crimping tool ($9; Amazon)
- Heat gun ($19.99; Amazon)
- Clean rags to wipe off excess sealant ($24.99; Amazon)
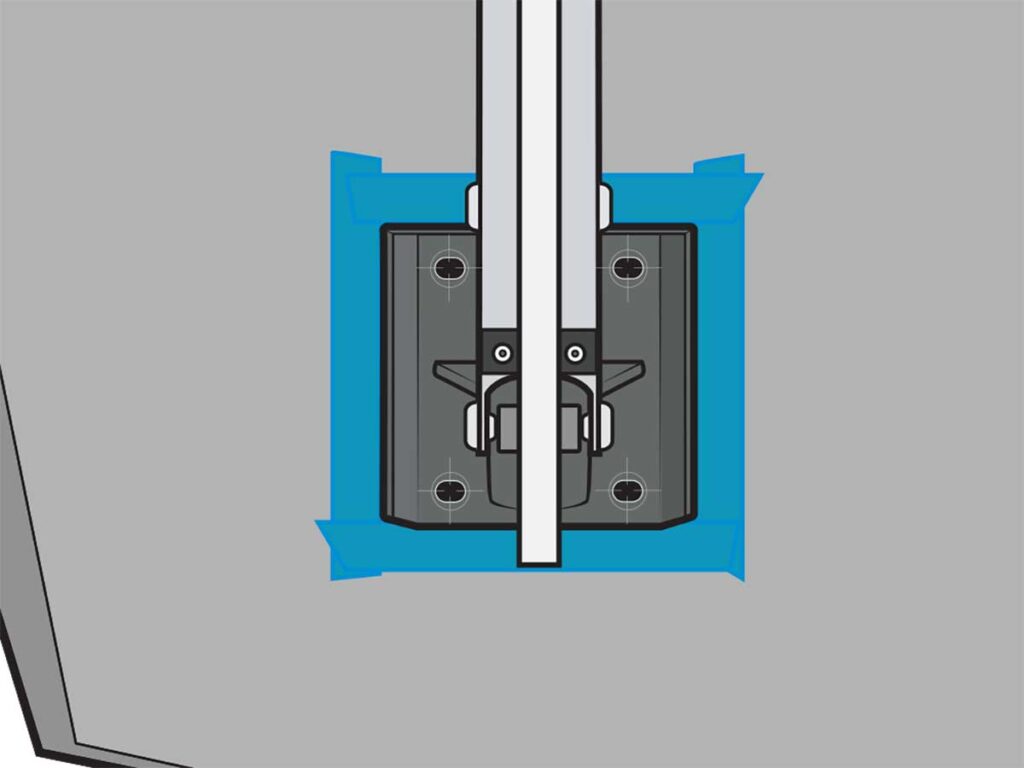 Mounting Location
Jim Hatch
Mounting Location
Mounting Location
Jim Hatch
Mounting Location
Cover the mounting area with masking tape to prevent scratches. The lowest point of the mount must be above the waterline to prevent adverse boathandling. Ensure that the bracket is parallel with the waterline and there’s no interference with the trim tabs and the Axis. With the anchor held in place, operate the outboard motor through the entirety of its turning and trim range to confirm that there’s no interference. Also make sure there’s enough room inside the transom to tighten the mounting hardware.
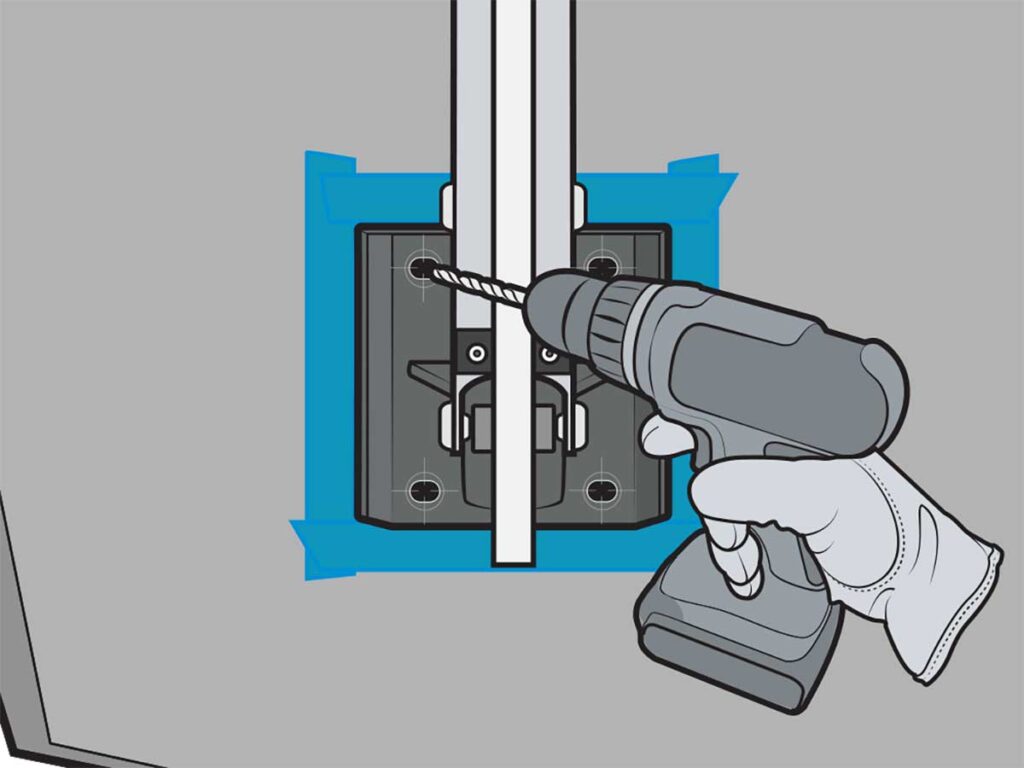 Drill the Holes
Jim Hatch
Drill the Holes
Drill the Holes
Jim Hatch
Drill the Holes
With the help of another person, hold the stern mounting bracket against the transom, and mark the location of the four holes with a marker. Set the Axis aside, and make sure there are no objects that you might accidentally damage while drilling the mounting holes. Use a 1/8-inch drill bit and power driver to drill four pilot holes though the transom where you marked their locations. Next, refit the drill with a 3/8-inch bit to drill perpendicular to the surface through the four pilot holes to open them up.
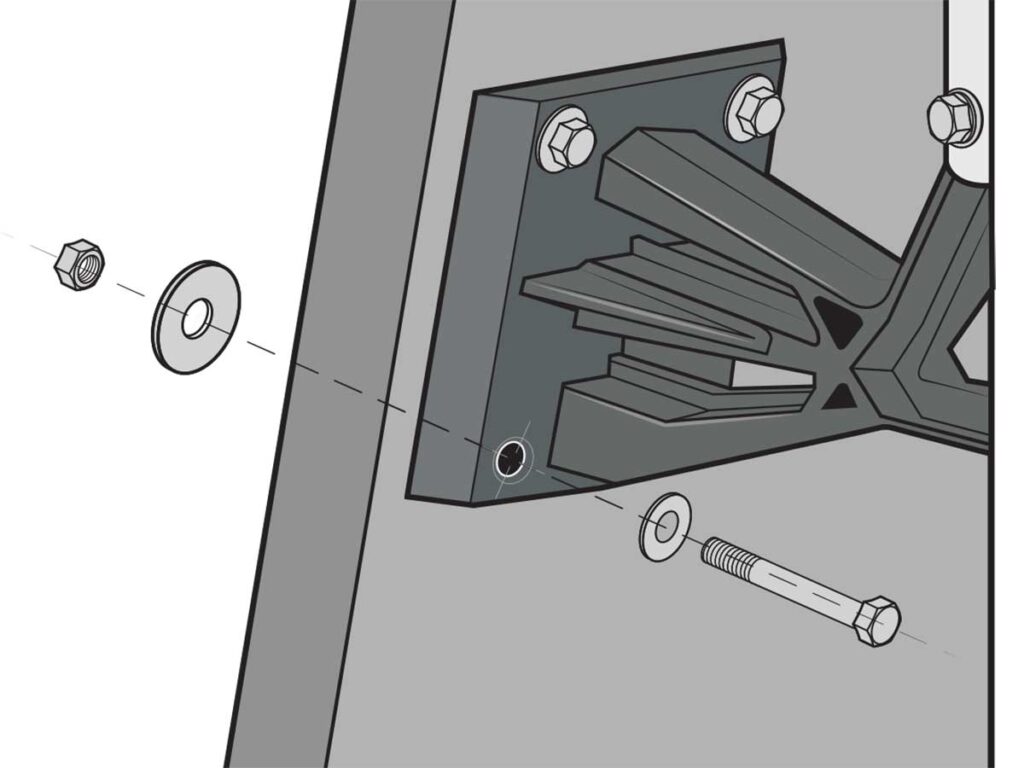 Install the Anchor
Jim Hatch
Install the Anchor
Install the Anchor
Jim Hatch
Install the Anchor
Apply sealant on the mating surfaces and mounting holes. Align the bracket with the holes. Insert into each bracket hole one of the supplied 3/8-inch 16-by-3-inch-long hex head bolts with washers. Push them into the transom holes. From the inside, place one of the supplied 3/8-inch-by-1 1/2-inch-diameter washers over each of the bolts, then thread on a 3/8-inch brass locknut. Have a buddy hold the bolt heads on the outside while you tighten the locknuts from the inside using a 9/16-inch wrench.
Tip: Route the 12-volt power and control cables from the Axis to the battery compartment and location of the RF module, respectively, via the main rigging port or a watertight cable clam such the Blue Seas System model 1003100 on the transom, motorwell or stern deck.
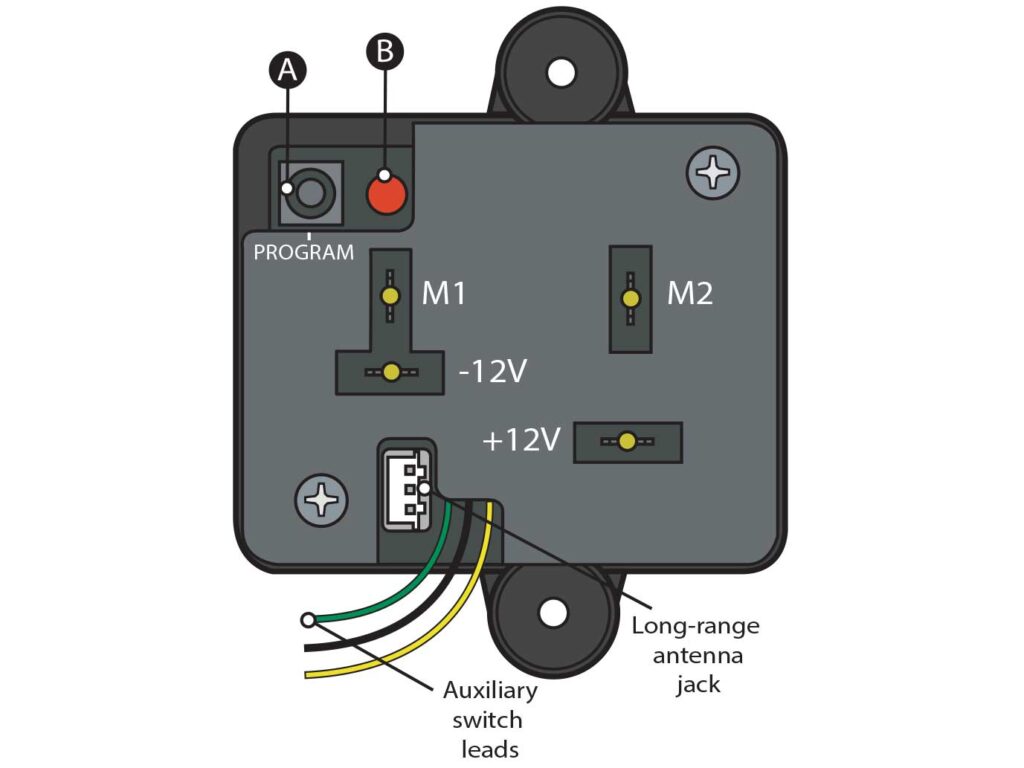
 Install the RF Module
Jim Hatch
Install the RF Module
Install the RF Module
Jim Hatch
Install the RF Module
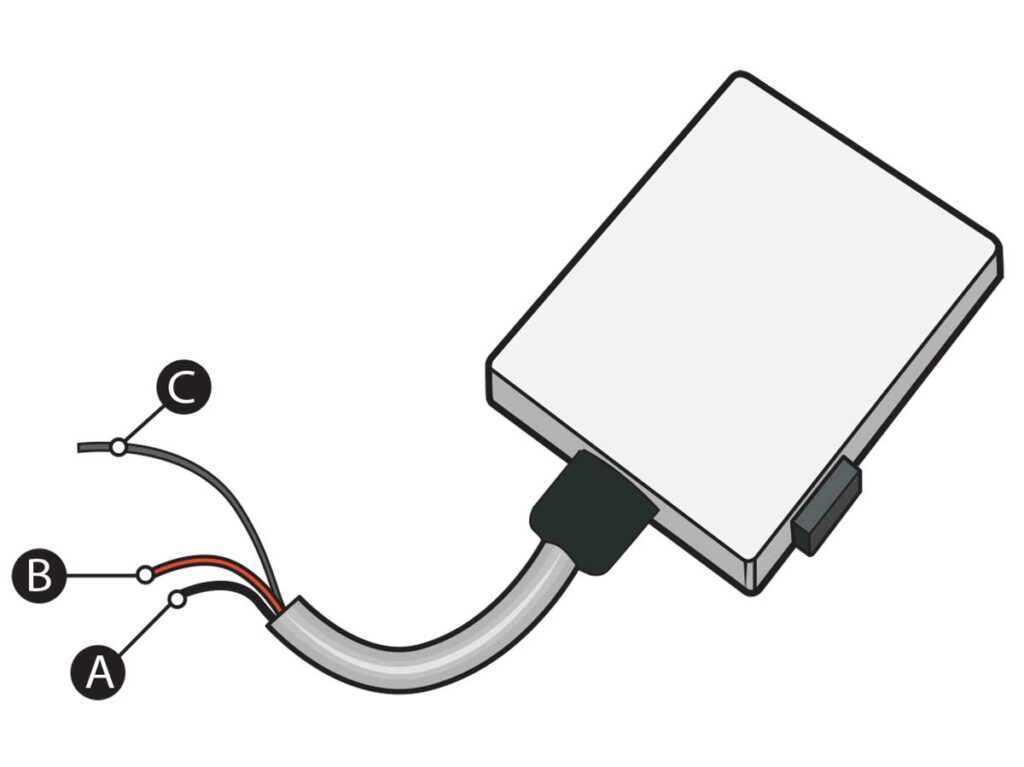
Tape the supplied mounting template for the RF module close to a 12-volt DC power source, then drill the four holes with a 1/8-inch drill bit. Secure the module with the four supplied No. 6-by-3/4-inch screws. Using the heat-shrink crimps, connect the short black lead (A) to the negative 12-volt source and the short red lead (B) to the positive 12-volt source. Plug in the longer black lead (C) into the receiving plug on the Axis. Next, connect the Axis’ main positive and negative power to the battery bank.
Tip: Lippert recommends that the two power leads be connected to a battery switch because the RF module will draw a small amount of power when not in use.
Read Next: How to Anchor Using Alternative Methods
 Programming
Jim Hatch
Programming
Programming
Jim Hatch
Programming
The transmitter and receiver can be configured two ways. For momentary mode, the receiver output remains active as long as the transmitter switch is depressed, and it turns off when the switch is released. For latching mode, the receiver output becomes active as soon as the transmitter switch is depressed and released. Receiver output turns off when the switch is depressed and released again. Follow the programming instructions in the manual to configure the module to your preference.
The post How to Install a Shallow-Water Anchor appeared first on Boating Mag.